Sunday 17 December 2017

Day 17 - For Now, It is the Last One Before January

The experiment I wanted to try involved attempting to make MDF look like polished black quartz, and I am quite pleased with the experiment.


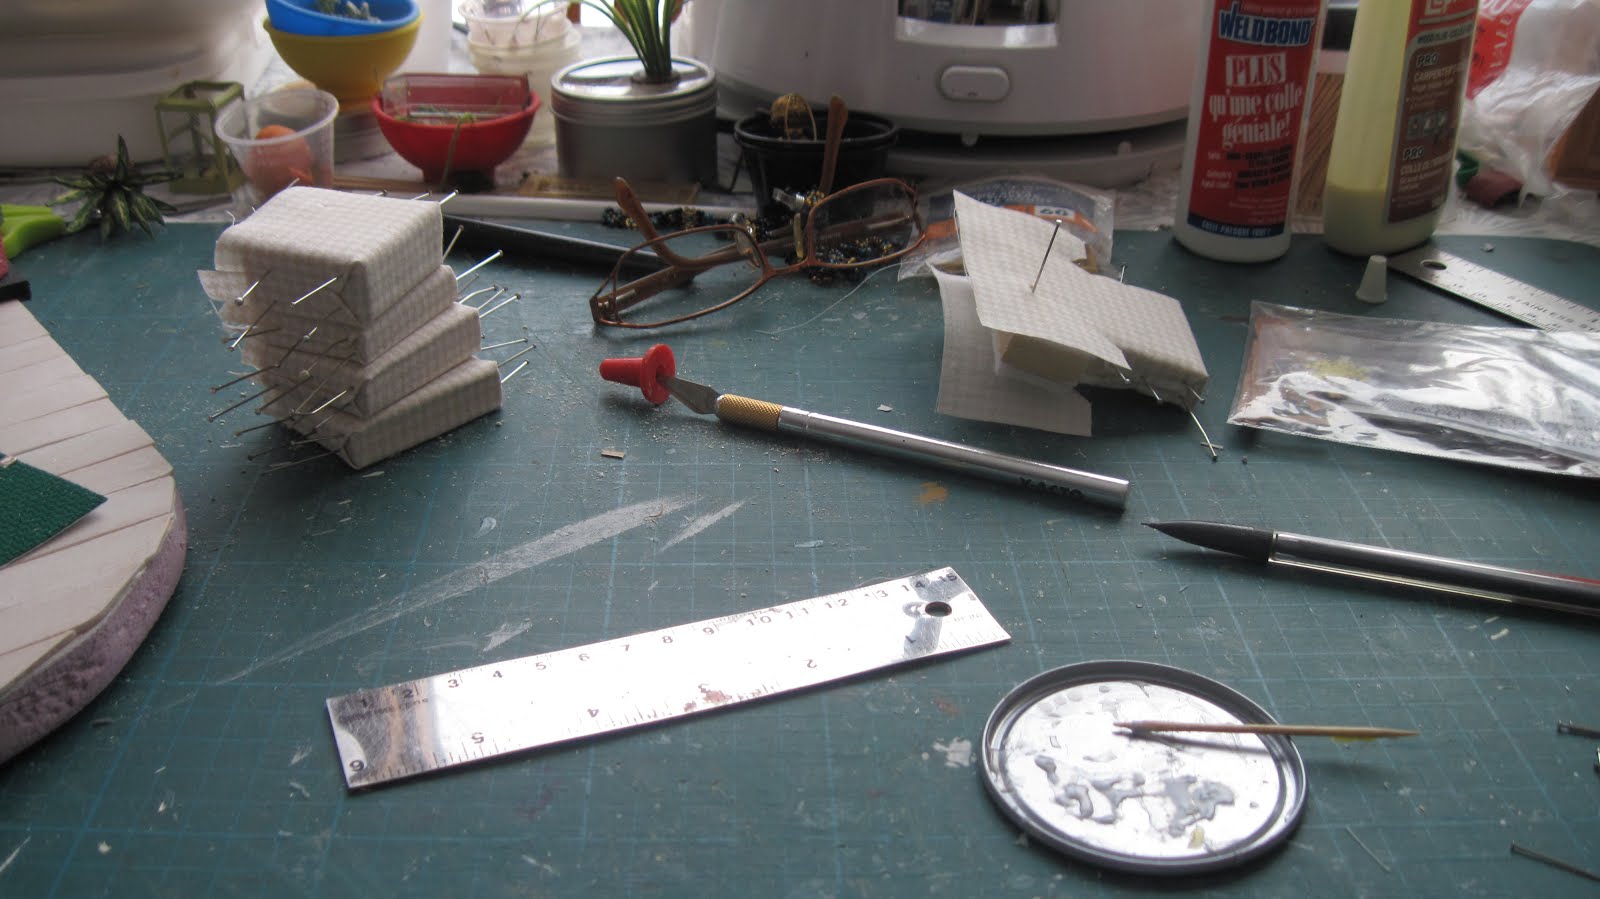
The mantel piece and hearth were painted flat black, and allowed to dry. I used a mix of ultra fine pearl glitter and gold glitter, mixed together. The surfaces of the painted wooden pieces were brushed with gloss varnish, and then I used the end of a drinking straw to pick up a small amount of the mixed glitter, which I then tapped quite sparingly over the wet varnish. Once that was dry, I put on another coat of varnish to keep the glitter bits trapped. It is fairly subtle, you get the sparkle depending on how the light hits the surfaces. You can see a bit of it in the photo above.


The piece is now glued together, ready to dry overnight. The edges that are not showing are bristling with toothpicks, which hold everything steady, and which I will trim off and push in flush once the glue is dry. The shiny black does not overwhelm the vignette, and will be even more part of the scenery once the other things go into the setting.

We are about to travel, and have visitors as well as be visitors. That means I will not have access to the computer, so I will wish all my readers a very Happy Christmas or Hanukkah season, and a very Happy New Year. I should be back with the blog in 2018, when I will be continuing with the small decorative aspects of the vignette. There will be a shelf in the space above the table, for instance, as well as a wreath, garlands, a Christmas tree, cards, presents, and other seasonal decorative effects.

I wish for you to enjoy time with family and friends, and to come out of the holiday season refreshed and ready to tackle another, hopefully creative, year.

Saturday 16 December 2017

Day 16 - There Is Now a Chair...

...and a mantel for the fireplace. I dug out a fireguard kit from Camp MiniHaHa a long time ago, and will try that for the fireplace. The chair is Day 4, the fire guard is part of Day 13 while the mantel was actually part of Day 1....


Those bits bristling with pins are the various components of the chair. I used a design from Carol and Nigel Lodder's book, Making Dolls House Interiors,  a style I hadn't tried before. I didn't use foam, as I find it really deteriorates with age, and turns into powder. I would like to add some piping to the chair, so perhaps tomorrow I will try Kris Compass' technique for rolled piping - that should get glue everywhere!


The chimney breast is now glued in, but I still haven't glued up the walls, because I want to try a special finish on the mantel and hearth first, while I can work without corners and edges. If my thinking on the finish works, I'll describe it in another post; if it doesn't, both those pieces will have to be repainted and rethought....

The colour scheme is still harmonious, as I had hoped. I must admit I was a bit concerned about using stark black in a miniature. And I still haven't had to buy anything except the view out of the window. Which goes to show that I have way too much stuff in my stash!

Friday 15 December 2017

Day 15 - I Am Working on the Chair

...and it is taking time. Today, like yesterday, was too busy to get much done in the way of minis, but I fully intend to have the chair ready to go into the vignette tomorrow. Stay tuned!

Right now all you'd see is pieces of balsa wood with placemat batting and cotton quilt batting, not very interesting at all.

Wednesday 13 December 2017

Day 13 - A Rug and an Ottoman


The rug is the one specified in the Advent Calendar instructions; a base, in my case hunter green Aida cloth, with some rows of threads removed. Woven into the holes is miniature hat straw, and then a row of running stitches done with cordonnee embroidery thread. The whole is then provided with a backing of iron-on interfacing. I like it! However, it is a bit touchy with the embroidery cloth; burlap or a loose weave wool would have been much easier to weave through. Once the vignette is finished, I'll use some repositionable glue on the corners of the rug to keep it down.

The ottoman is one I designed myself, as I didn't like the one in the article. I gave it a little bit of co-ordinated piping, done by sandwiching floral wire in a strip of cotton. It isn't perfect, but I kind of got the idea across. Now I have to make a chair to match. The piping is a bit of a pain to do....

Tomorrow I work, so I don't know how much I'm going to be able to get done.

The rug is the Day 3 project, while the ottoman is Day 5. I am still catching up with the program!

Tuesday 12 December 2017

Day 12 And the Fireplace is Bricked


I spent the morning finishing the embroidery on a Real Life Christmas stocking, and the afternoon and very early evening bricking the fireplace and the fire back. I can't wait to put this corner vignette together permanently! It is being held up by my clamp bucket and the brush jug, and it is a pain....

The bricks are painted sandpaper; I had read on-line that someone had painted sandpaper and then noticed a nice texture where her fingers had accidentally landed, so I dabbed my wet paint with a wad of paper towel, and it does give a very nice additional texture. It still needs a bit of chalk aging and then a spray of artist's preservative.


This picture is actually in focus, unlike yesterday's, and shows the fireplace nicely. As I forgot to add the mantel before doing the bricks, I left a strip bare to attach that to. That's for another day.

Day 1, 2, 7, and 8 are now more or less done; that just leaves 20 more days to do in less than two weeks. Well, it will not be finished before Christmas Eve, but I will get it as close as I can and then complete it in the New Year. I'm just extending Christmas, I guess!

At least I'm keeping busy and back with minis....

Monday 11 December 2017

Day 11 - The Curtains Are Up


Today saw the table get a tablecloth, and the curtains go up on the window. I really like the colour scheme so far; the fireplace will get white bricks, and of course there are lots of other seasonal touches to go into the project.(Unfortunately, my photo is not quite in focus.) The curtain fabric is a wool-like random stripe in red on green, and handled like a dream; I think it is fabric left over from the country decorating craze. A few years ago I bought a shopping bag of bits and pieces from a quilters' rummage sale. The homespun cushions were made from fabric from the same batch.

Now if I could only find a small, limp doily for the table! I think I'd better hit a couple of second-hand and antique shops in town.

Next up, I need to make a chair, ottoman and rug. That will finish the major furnishings, but there are lots of smaller items to come. I'm thinking of wrapping the outside of the vignette in unbleached muslin fabric; my daughter used bolts of this stuff to make fitting mock-ups for her customers, and some of it comes in nice big chunks. I kind of hope that using the fabric, which is quite sturdy, will reinforce the vignette. And the cream colour should match the  colour scheme.

The vignette is still being held together with masking tape and my brush jar; it's so much easier to work on flat pieces, that I won't glue and pin the walls to the floor and each other until I'm done with the bricks on the fireplace.

I got to spend all day on minis today!

Sunday 10 December 2017

Day 10 - Advent Project


It is late, and I am tired. Today, I finished the floor, cut and did the base coat for the hearth, stuccoed the fireplace wall, and put beeswax on the woodwork. The fireplace is cut into the chimney, which means bricking is next....

The cat is sitting at the left edge of the photo, she wasn't exactly helping me tonight!

Friday 8 December 2017

Progress Report Day 8

Today I accomplished several things, but still not as many as I had hoped! There are a dozen poinsettia plants ready, one for my Advent project, and two that were ordered; the rest are going to shows and sales.


Four different colours of poinsettias; one of the cream ones is for the project, two of the red ones were ordered. The rest are available for however long it takes to sell them! My stock is rather low right now, so I do need to build it up a bit. I also made three single poinsettias that I hope to incorporate into Christmas wreaths to match the plants. The little Christmas tree is the inexpensive ornament I picked up recently, for less than a dollar!


The "window" and the outside scene are now in place on the window wall, and I managed to sew some of the soft furnishings; these are actually Day 7, but I am definitely not doing this project in the order the designer did. Three of the cushions are complete, the printed one needs its bunka braid edging, and the little quilt needs its stuffing and quilting. That's for tomorrow, hopefully .

Tomorrow is supposed to be our miniature club's Christmas Pot Luck party, but we are being threatened by the first snow storm of the season, with 20 cm (8") in the forecast, so it may have to be postponed.


A better look at the soft furnishings; the three check and stripe pillows have a dark red bunka edging, while the print pillow and probably the quilt will get a slightly brighter edging. I don't have a bright green in my bunka stash, just olives and light greens. Although the little houses are not lined up in a check pattern, I think it will still work well as a quilt in this scene.

Now I am going to relax for a while, by watching television and then reading a few chapters in my library book.


Wednesday 6 December 2017

Got Some More Stuff Done - Day 6

Although my fellow Advent Calendar creators were unable to come, I worked away by myself and am quite pleased with what I have managed to do today. Mind you, I didn't do anything else....


The floor is done, except for the area where the fireplace hearth will be placed. And the wainscoting on the fireplace wall is in place, with a void where the fireplace and chimney will go. The woodwork still needs painting, but as I am using universal glue, which it is recommended you give 24 hrs. to dry, I will have to do that tomorrow. Then I have to apply the tissue paper stucco to the upper half of the fireplace wall.

The cardboard cylinder is the form for the table, while the strip-looking thing is the pelmet for the window. They are ready to be covered with fabric, although I need to get a tiny doily for the over cloth for the table. I work tomorrow until 3 p.m., and intend to head into town to see if I can find a nice small doily in a second-hand store when I am done.


This is the fabric I hope to use: the green aida cloth will become the rug, trimmed with the cream cordonnee embroidery thread and hat straw in the plastic dish. The beige-looking thing is a tiny houndstooth print in ecru and beige, for upholstery, nice and neutral. The green and red stripe is for the curtains. The print with the little houses will become a quilt and an accent pillow, while the stripe, checks and plaid will become other pillows. And the wine colour will be the under cloth for the round table.

I also found a largish red and green basket; with the handle cut off, and filled with cut twigs, it will become a firewood basket. Two large jewelry caps and a bead will become a decorative box. I picked up a tiny green tinsel tree, which will likely become a table tree in the vignette;  it is a cheap but very effective ornament.

What I am missing is a good photo for "outside" the window; the one I tried to print, from the blog, came out far too dark. Perhaps my husband could help with that....

If I have the energy, I may do the pelmet and under cloth for the table this evening, as they could then dry nicely until I can get back to the project again.

Tuesday 5 December 2017

Real Life Snuck In Once Again

Today I decided I would dedicate the morning to working on a Real Life cross-stitch Christmas stocking for my new son-in-law, and then use the afternoon for miniature making. Well, I forgot an appointment in the middle of the afternoon, with the result that the only mini thing I got done was to paint the stucco wall in my vignette.

Tomorrow, the other two ladies who are working on the Advent Calendar vignette are coming over to do minis with me, which means I have high hopes I will get more done tomorrow!

Monday 4 December 2017

Advent Calendar Day 4 ...

...although I'm still kind of on Day 1. Today I made another 3 poinsettia plants; 3 more tomorrow, and the day after that. By now I should have the room completed, the curtains up, and the fireplace in, so I'd better keep on going.


But the stucco is on, the window is framed, and the wainscoting has been sort of pickle painted; you brush on and then wipe off the paint. I see I am still very straight-line challenged, judging by the window top!

The floor is partially planked, and I need to decide which fireplace design to use, in order to go forward. The planks will also be pickle painted, as will parts of the fireplace wall. The original design has a very European, i.e. quite tiny, fireplace without a hearth; I'd like to have a hearth, as it would give me a good surface to place decorations on.

I need to find a scene to place behind the window. I'd love to use a photo of my own back garden in winter, as this will likely go to my younger daughter, but I don't think it is on my camera any more, and I don't know if I can capture a photo from the blog to print. I must ask her.

The vignette is quite white and cream in colour, in order to set off the various furnishings and decorative items that will be made for it. Right now the wall is sort of white, but tomorrow it will be painted in light buttermilk.

Sunday 3 December 2017

I Think I'm Back....


Yesterday, our Fame group exhibited at the model railroad show again, our fourth year. This year, our name was even on the poster! As there was an extra table for us, I offered to do a flower-making demo, as one of our members had commissioned a couple of potted poinsettia plants. Two of them got done at the show, the third I just finished, and I'm starting 3 coral and 3 hot pink potted plants. Doing it at home is much faster than at the show! My plan is to have a dozen of these plants, in four different colours. There are various stages of completion on the cutting mat and stuck in the foam block.


The other thing I'm working on is a miniature project that follows the principle of an Advent Calendar; in this case, you do a mini a day and by Christmas Eve you have a completed setting to decorate your home. Hmmmm, well Dec. 1 we had company, so no minis got done. Yesterday, Dec. 2, I spent at the show. So all I have done so far is what is above, along with the window lining and frame. I think my Advent Calendar will have to be worked on well into the New Year....

To motivate myself, I'll post what I managed to get done every evening - the first part of the project is the setting itself, so rather labour-intensive. As one goes along, the projects get smaller and easier to finish in one session. To further motivate myself, two mini friends are participating in this challenge, and are also making their version of the Advent Calendar.

This particular project comes from the German miniature publication, 1 zu 12, and was designed by their editor, Rita Beninde. The magazine was a gift to me from one of my Camp MiniHaHa friends. She occasionally gets an extra when mail is inexplicably delayed, and as I can read German, and love their projects, I am very happy to get this magazine! This project was published in their Nov./Dec. 2011 issue.

We agreed that we don't have to do every project, some of which didn't appeal so much to our North American eyes. So we will also be delving into our respective stashes, and seeing what we have squirreled away that will work with this project. Hopefully, I can get photos of all 3 finished projects early next year.

Now I have to relearn how to center my photos! Back to gluing petals on poinsettia plants....

Wednesday 1 November 2017

...And I Thought I'd Be Back By Now

Well, I'm not yet completely back; the family wedding - my youngest daughter - happened mid-September. Now, we have to get ready to move her from the east coast of Canada, to the foot of the Rocky Mountains near the US border.

I have been to a meeting of FAME, and have also seen the projects people put together at Camp MiniHaHa this year. The campers very kindly sent me a care package of quite a few of this year's tidbit gifts, for which I am very grateful. Next year's project is a modern cabin, rather intriguing, as it lends itself to quite a few possibilities. So, I will start saving my pennies, and hopefully I will get back to camp in 2018.

Our next event as a mini club is to attend the model railroad show locally; this happens in early December, and I will have to get cracking to electrify my club project, so it can be displayed with the other interpretations of it. I had hoped to make some autumn/winter flowers for it, but that is still having to wait a bit.I need a clone or two or a hundred of me to do all the things I want to do!

Wednesday 12 July 2017

Coming Up - If My Stars Align!

Last evening, I attended a summer meeting of our FAME group; there were several members working on a half scale fire place, and two of us working on our own projects. Back in 2012, I started an overstuffed chair project, and I went back to it, finally, yesterday.

As I am also clearing up my sewing room, by passing on bags of fabric and yarn to various places that said they could use them, I am not able to finish right away. However, I did enjoy my mini shot-in-the-arm, and am encouraged to finish the chair as soon as possible.

Hopefully this weekend.....

Tuesday 27 June 2017

Keeping Up

The backdrop quilt for the upcoming family wedding is now being professionally quilted. There are some smaller items I also have to put together, so it will be a little while yet before I get back to minis.

I hope your summer is less rainy than mine, so far....

Friday 26 May 2017

Just to Let You Know

Posting will be very light for the next while, as I am in the process of doing things for a family wedding this September. Things have to be gotten underway now, as others have to be involved in the finished products as well.

I'm going to try to fit in a day of minis every once in a while, just to keep my hand in....

Friday 19 May 2017

I'm Working, I'm Working...

For some reason, perhaps to keep my brain working, I keep challenging myself. Last year, I purchased an old embroidery kit from an estate; the date on the instructions was 1980. The needle had become rusty. And the masking tape holding the silk 40 ct gauze had dried out.


So that's it; a CJ Originals kit for making a door stopper brick, in this case with a butterfly design. I've never done such a small count before. I had to wear my task glasses, and use the large magnifier lens to see what I was doing. I made a bit of a, hopefully, not too obvious mess when I missed one line of stitches in one of the bows, and I also went two rows in the same direction, creating a bit of a line that I hope won't be all that visible. Also, I suspect I made one short side larger than it should be. I started this Wednesday, worked Thursday, and finished the embroidery today.


And Blogger is being a real pain today, although the photo was taken horizontally, it insists on printing it vertically. I've rotated it twice, but it still prints the wrong way. This will go into last year's Camp MiniHaHa project, as it tones with the Steam Punk furniture upholstery and rug.

Now I have to take this out of the frame, then sew up the corners, and attached it to the brick. That's for tomorrow, I am cross-eyed....

Monday 15 May 2017

Good Grief!

OK, so Tuesday evening I'm giving a talk on miniatures at a rural library not far from here, so instead of taking large pieces with me, which have to packed, unpacked and repacked, I thought a looped slide show of my miniatures, at least the finished ones, would be a good way around that. I will bring a couple of boxes and vignettes. I've been attempting to photograph everything for tomorrow. as I can't take any photos off the blog; the pictures are too small.

Why do I keep misplacing things? I think it is because I have too many things. While I try to store everything I have made sensibly, and display whatever I can, there is just too much. And there are way too many demands on my time for me to reorganize things for the foreseeable future.

Why do miniature electrics keep breaking? Why are battery packs constantly running on empty? And why, for that matter, do my miniatures themselves keep breaking? The fine wiring on LEDs running on coin batteries break every time I travel with them. Not everything can be hidden in false walls and the like, and those tiny wires are like hairs.

I need to cut down on my stuff; but I know the minute I get rid of something, the perfect purpose for that something will suddenly appear, and I will  be back to having to order a replacement on-line, deal with foreign currency, and sky-high shipping and handling costs, not to mention import fees.

And why does the cat want my lap just as I am trying to drink a cup of tea and do a blog entry?


Monday 8 May 2017

Moncton Show Report

As promised, I managed to get some photos of the FAME club projects, as they were exhibited, at the Moncton Miniature and Doll Show held last Saturday, here in our little corner of Canada.


This is Marilyn's entry, and that is Marilyn lurking in the background. She made a library, in honour of her father, whose name has been given to the library. There is a sign in the window to indicate that the library will be opening soon - it is still under construction. Marilyn designed and cut the projects that club members then purchased.


Louise's entry is a quilt shop, with a wonderful perspective photo enlarging the interior. It is going, I believe, to an aunt of hers who is a very keen quilter.


Sharon has been collecting blue and white china for quite a few years, and has turned her little building into a china shop. Everything is blue on white, very serene, and her china collection has a lovely showcase here. The shop is also lighted.


Garry made his shop deeper, and added a side building on to it; it is a Wild West bath house, with a 2-hole outhouse next to it. The bath house has two tubs, and lots and lots of accessories in it. He is our most experienced miniaturists, having spent around 3 or more decades on this hobby.


Krista is a collector of miniatures, but this shop is her first actual mini that she built herself. It is a sign shop, just full of signs of all kinds, including a bargain bin on the left. Pretty darn good for a newcomer, isn't it!


This is Louise's version of last year's Camp MiniHaHa project; a modern VIA railroad station, with a section of track, a bus shelter that is a faithful scale copy of our city's bus shelters, a newspaper vending maching, and although you can't see it, there is a Tim Horton's coffee shop on the mezzanine,
behind the graphic. If you would like to see more photos of this thoroughly modern mini, drop in at the Charminis blog which is shown to the right of this blog entry. We have decided Louise is our Queen of Modern Minis.


The Moncton Miniature and Doll Club always has a club competition table; this is an overview of the entries for this year. Unfortunately, I didn't hear which scene won the competition....

Hope you enjoyed this show report!

Wednesday 3 May 2017

The Finish Is Getting Very Close

I woke up again around 3 a.m. and simply could not get back to sleep. What usually happens in these cases is that I think, and I think, and so on. Well, maybe something clicked subconsciously, because I went out to the patio at first light and found some really cool rocks.


Something was needed for that very dark, right back corner, and there are now 3 very interesting stones sitting in a bed of white gravel, flanked by a hosta and a grassy thing (made of plastic bits!). I also made an area of gravel from the veranda to the hosta plant. That done, I began to plant the hostas in front of the left hand wall, and they are now done. As you can perhaps see from this photo, another interesting rock will flank the gate, along with some mounds of "moss" and a Japanese variegated iris.

The sleeve fence next to the veranda is in place, and has been underplanted with a chunk of foliage and some pieces of another plastic plant. The Japanese maple will be in the space between the fence and the iris, once I get the hole drilled. I am almost done with the ground cover on the right, inside the gatehouse, and have begun with the "dirt" for the remaining hostas in front of the gate.


With the gate in place, you can see that I am very near the finish line. Tomorrow I work, but I may have a couple of hours in the early evening to "plant" the maple, and glue down the walls and gate.
Maybe my brain will allow me to sleep tonight....

Tuesday 2 May 2017

How I Made the Hydrangea Bushes

This is a photo-heavy post, as it is a tutorial of sorts. The basic method of making the hydrangea bush is the same as for the geraniums, i.e. a dome of Crayola Model Magic on a stem, painted the colour of the flowers. (Click on the photos to enlarge them for better visibility.) You can go back to the geranium tutorial if you haven't seen it before.


I used a 3-leaf punch for the leaves, and hand-painted paper in a very lively light green; this is actually the back of the leaf paper, but hydrangea leaves are quite a bright green. The blossoms were punched with a custom punch from Hanky Panky Crafts, their tiniest 5-petal blossom, and a blue greeting card envelope with some variation in colour on the inside, which means more realistic flower colours.


The dome is a green-painted, halved styrofoam ball, the base for the hydrangea bush. The blossoms on the right are already covered, while those in front are the ones with "buds", very pale green-painted poppy seeds. The leaf wires were completed earlier; there are 5 with 5 sets of leaves, and 4 with 3 sets of leaves. Some additional leaves were cut and shaped ready to fill in gaps when the flowers were "planted".


I cut off a small portion of the plant base, as this plant like the other one, will sit up against one of the walls. Before planting, I add a pair of leaf sets below each blossom. (The pointy things on the right are the variegated leaves for the iris.)


This is just the flower heads glued into the foam base; start with the tallest at the back, gradually cutting them shorter down towards the front. Remember that the plants can still be shaped into pleasing curves, once the glue is completely dry.


This is the completed bush, with the leaf stems added and a few additional leaf sets added here and there to fill in empty spots.


And here they are, placed in their corner. The empty space behind them will, hopefully, be filled with a small, cloud-pruned pine; I still have to source the blue-green foam foliage for this, not to mention making the trunk. It will be done after the show this weekend, but perhaps in time for the miniature presentation I am doing for a rural library the middle of May. The grass has now been filled in over the green-painted area, and the left side of the garden courtyard is now DONE! Well, except for the hoped-for cloud pine.

Having two bushes in this area is much better than just the one, I think. The white strip on the base is where the large front gate will go.


It's Not Going To Be Finished, But

When I woke up very early Monday morning, I realized that I was starting to get anxious to finish the Japanese Courtyard completely, so I decided, for my own mental health, that I would do as much as I could and exhibit it as a Work in Progress.

That decision made, I was able to finish up two pieces to fill the empty wall spaces in the Shabby Chic flower shop.


The mirror-backed arched window flower box is a miniature of the one across from our bed at the Inn at Fisherman's Cove, in Eastern Passage, Nova Scotia, where the Carpenter-in-Chief and I stayed the night of the CFB Shearwater hobby show. I'd been trying to think of something to display hanging plants, and this one was just perfect to do in miniature. It still needs plants, though.

The arched-top shelf unit will hold plants and flower shop stuff; it was hand-painted and aged to look like an old piece reclaimed from granny's attic. The flower box is made entirely of mat board, with floral wire muntins and mirror card on the back. The shelf is a combination of mat board for the back and sides, with wood for the shelves.

Today I worked on the second hydrangea, and there is a variegated Japanese iris in the making for the corner by the longer fence, which is quite dark and needs lighter-coloured stuff. The spade-shaped things in the foreground of the photo is an attempt at a large blue hosta which may not be successful!
And the painted domes are, of course, bases for garden plants.

So I did a tutorial of sorts for the hydrangea, for which I'll do a second entry. At the moment, the "grass" in the hydrangea corner is drying, so I have a little bit of time.


Saturday 29 April 2017

Hydrangea Plant No. 1


Seen from the right side, the first hydrangea bush is in place. Why the first? Well, I suspect another one will be needed against the rock wall on the left, it looks a little bit lost there on its own.


As seen through the left-hand fence, there is still a fair bit of space in this corner. I wandered around my mostly dry garden this evening, to see if I could spot a good, twisted twig to become a cloud pine, but have now resigned myself to the fact that I will have to make my own pine tree armature. Hopefully, the dollar store still sells cheap, painted floral wire, because I need a fair bit of it to make a decent trunk and branches. A short cloud pine would fill this corner very nicely, if I can find dark green model railroad "grass", that is. I'll try the store on Monday; it is in a private house, and I do not really like shopping in people's homes.


Just a peek through the main gate....

When I googled Japanese hydrangea gardens, it immediately became obvious that the hydrangea season is akin to cherry blossom season, with masses of hydrangeas and hundreds of people wandering through. Add another day of work to make the second hydrangea bush! And the show is next Saturday.

Friday 28 April 2017

One Quarter Done


The corner with the water basin and the lantern is now done to my satisfaction. I added a bush (foam ball cut in half, painted, coated in railroad coarse "grass"), a hosta plant, some pinkish stuff kind of the same colour as the Japanese maple under the hosta, and a stepping stone and grass. The grayish things to the left of the lantern are plastic plant parts, as some height in a neutral colour was required there.

Next, I have to make more hydrangeas for the bush that will go in the other quarter of this size of the garden. Five flower heads have been made, but I think I'll need at least a dozen to make a good show.
That's for tomorrow, along with many, many leaves....

Stuff Everywhere....

Landscaping takes time. You can only do a small area at a time, fitting components of the landscape in place, deciding if they work that way, drawing around them so you know where the grass grows, and then the inevitable waiting for a thick application of tacky glue to dry so you can brush off the excess of that darn staticky foam that gets everywhere.


One small corner is more or less done, with voids for where other elements of the design will go. I painted up some very good plastic fern fronds I acquired years ago, and sponged and painted them to look like Japanese painted ferns. I have some of these in my garden, right outside the window beyond my work area, and every year I kind of hold my breath in the hope that they've survived yet another Canadian Maritime winter and its snowloads.


It's a mess! Bits of plastic greenery, paper leaves and flowers being prepared, pieces of styrofoam balls here and there, and I haven't photographed the mess on the floor around my work area; boxes and bags of landscaping materials. In the foam block hosta leaves and variegated iris foliage are drying; I have to figure out how I am going to place these in the base. It will likely involve drilling holes in the MDF and bundling leaves into clusters tied with fine gauge beading wire. The little yellow container is full of printed hosta leaves ready to plant around the front corners of the vignette.

And by the way, there is a snowshoe hare sitting on my lawn, just beyond the trees of the empty lot next doors, chewing at leaves or grass or something. It is partly still white, although the more normal brown summer colour is coming through....


It's the white thing on the grass at the edge of the path....

Tuesday 25 April 2017

Green Foam Bits Everywhere....

I started some of the landscaping yesterday, and managed to finish getting the gravel onto the walkway.


I rather like the wider strip to one side; this was taken directly from a pathway nobedan I found on the internet. It mimics so-called label stones with crazy paving, with gravel at the edges and in between.

This next photo, despite the flash, is quite dark;


I'm going to pretend it is evening here! The green domes are the beginning of round mossy ground cover, that will go to the side of the lantern. Because so much of a Japanese garden depends on playing off shades of foliage with accents of colour, I am using some plastic plant pieces to mimic various ground covers. It's a good opportunity to use up some of that stuff I've been giving house room to for twenty years.

The grass has been "planted" around the bamboo, and next to the shoe-removing stone by the step to the veranda. It's a very messy job, as everything is very staticky - hence the title of this post. In order to create various shades of green, I'll mix the various colours of railroad foliage I have for the different foliage mounds. Now that most of the snow is gone, I hope to find a good twig - or perhaps I'll have to create one - to act as the trunk for a cloud-pruned pine or juniper, very Japanese and a good foil for the maple, the many hostas, blue hydrangeas, and possibly rhododendrons and Japanese irises. I also need to make a variety of sword-shaped leaves in a wide range of colours.

Which means that I won't be tidying away all the foam for a while yet!

Wednesday 19 April 2017

I Am Not a Happy Camper....

The walkway's stones are in, I forgot to chalk them so that will have to be done after the fact, and I will also have to figure out how to fix the chalk because I don't think I can spray the vignette without a great deal of masking.

Why am I not a happy camper? Things were going so well. But, I have mislaid, lost, misfiled, call it what you will, the coarse white gravel I used under the veranda of the house. I need that to fill in the gaps in the stones of the walkway.


As I really, really want this finished, I decided to try the dark gray fine beach gravel/coarse sand, but it is too dark for the gravel of the veranda. So that won't work.


So I borrowed some white gravel from a little zen garden I got years ago, but it is too white. That won't work either. I need the slightly grayish/yellowish gravel I used before. There are two more bags of sand from that batch, each finer in consistency and they are simply too fine, too much like, well, sand, to simulate gravel here.

Bah! Tomorrow I work, and then I am away for a few days. The show for which I want this finished is in about 2 weeks....


Tuesday 18 April 2017

...And Another Photo


OK, so I'm trying to encourage myself! This is the water basin in my hand....

Front Garden Tsukubai or Water Basin

I had intended to put the Japanese word in italics, but I guess you can't do that with titles.  As indicated Sunday,  today I worked on the water basin, which will go near the front door into the house behind the Japanese entrance garden.


It looks a bit unfinished right here, as the paper band holding the "bamboo" edging is visible; this will disappear once I add the "mossy lawn" to the setting (I hope!). The setting is illustrated in my book, as a Flat Garden, Intermediary Style; I am trying to stay true to Japanese garden design.

The stone basin is a repainted terra cotta planter that I picked up years ago on a yard sale table at a show. It is mounted on two layers of mat board, surrounded by "wet" stones, and has the bamboo pipe and spout behind it. There will likely be some ferns planted at the back of this element of the garden.

 Although it isn't visible here, the back of the water feature has moss growing between the stones; I think this may be seen if you look over the longer side fence into the garden. The dipper is made from manila card and a toothpick, with some faux finishing. The water inside the bowl is a piece of acetate that doesn't quite fit flush, which means it shivers realistically if the base is touched. That is what is called serendipity, I think!

The lantern also got a new paint job; now I have to wait for a sunny day to go outside and spray it to keep the chalk in place. It will also be set into the mossy lawn. After several really nice sunny days the last three have been gray, wet and miserable; we had a little snow overnight....

This morning I had an existential crisis at 3 a.m., probably as a result of attending a funeral Monday for a lady who was at least a dozen years younger than I am. It took the form of wondering if I should continue on with miniatures and other hobbies, or just finish what I have not finished yet and stop cluttering the house with my creations. I hate the thought of these miniatures being put out with the trash when I am no more; I don't know what to do with them when my time eventually comes - who is going to want this stuff? Not to mention the containers of components cluttering up the storage area in the basement. I think I will have to start giving stuff away....


Sunday 16 April 2017

That Took Some Time For Sure...

...especially with a cracked thumb on the right and a broken thumb nail on the left! Somehow, the ties I was using had an annoying tendency to either get caught up in the broken nail or on the adhesive bandage, which kept rolling up on me.


Do click on this one for a close-up view, it's actually quite convincing. This is the "moss" being applied to the cracks in the rock wall; I have a pet peeve with huge quantities of moss being applied to miniatures, as it completely wrecks the illusion. This is being done tiny bit by tiny bit, keeping in mind how the rain water and shadows of the rocks would affect how the moss grows.


I mix my "moss" up out of three or more shades of model railroad foam scatter, with tiny amounts of yellow and sometimes orange added to suggest flowering weeds in the moss; this is the  finished, mossed wall in progress in the previous photo.


This is what almost drove me around the bend; trying to tie each individual bamboo stake (reclaimed from a window blind sample) to the horizontals between the "cedar" (actually painted dowel) fence posts. This fence is a somewhat spread-out version of real Japanese fencing; it is wider apart because I wanted the garden to be fully visible, as that is the focal point of the vignette. Traditional Japanese fences tend to make what is inside of them invisible.

Now that the fences are done, although still not attached, I can concentrate on the actual landscaping of the front garden. I am thinking of trying to make shallow domes of air-dry modelling compound, to mimic the mounds of moss so often seen in Japanese gardens. Painted green, with the "moss" scatter glued on, they will add some shape to what would otherwise be a flat garden. Within groups of these mounds, I can place the water basin, lantern, and whatever else will fit in the garden.

I still have to re-tie the woven bamboo fence; for some reason, I can't wrap my head around how to get a decent cross-tie effect on this fencing. Back to the books for research!

Happy Easter, everyone. Although the last few days have been wonderfully warm, with blue skies and sunshine, today is overcast, grey and rainy....